First V5.1.2 is pretty old, maybe consider an update?
Second I Like KiCad very much, but it sucks at circles, or anything round.
Third Let those first two points sink in for a while…
Then I had a go at it.
I set the grid to 0.05mm because that grid fits with the resolution of the footprint you want.
My goal is to fist make a collection of simple primitives that can be drawn in KiCad itself, and then turn that collection into a custom pad.
I first created a "rounded Rectangle SMD pad, with these parameters:
That covers most of the area. I used a “corner size” of 30% to prevent the sharp corner form sticking out of the circle.
Second step was to create an arc with the parameters in the screenshot.
This is beginning to look like one of your pads now:
Third step is to add some more lines on the Silk.Screen layer (or whatever other layer, it does not matter much)
Note that I changed the line width from 0.12mm to 0.1mm. This fits nicely with the grid. The edge of the two straight line segments is now 0.15mm from the blue origin point of the footprint.
[Edit:] Using a polygon instead of the two lines as BlackCoffee suggested later is indeed a better option. With the polygon you can completely fill the area between the pad and the arc.
Note that there still are some gaps between the lines and the pad. I am too lazy to fix it, but you have to fill those gaps with some kind of graphic primitive.
Next step is the important one.
Drag a box around all your graphics to select it:
Then right click with the mouse on the drawing area, and select: “Create pad from selected shapes”. This turns all the selected shapes red and makes a single pad out of it. Such a pad must always have at least one “real” pad, because it uses that as the attachment point of tracks to the pad.
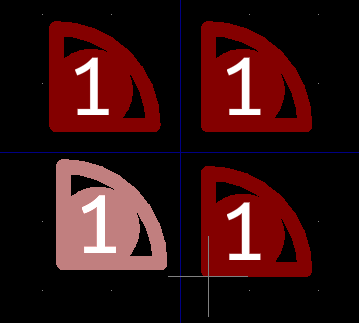
Next step, press [Ctrl + C] to copy , select a reference point, and then press [Ctrl + V] to insert 3 more copies of your Quarter round pad:

-
Click one of the pads to select it.
-
Press M to move the pad (this attaches it to the cursor)
-
Press R to rotate the pad.
-
Move the mouse cursor to get the pad on the right location.
-
Click to put the pad on that location.
-
Repeat two more times.
-
Click on each of the pads,
-
Press e for Edit.
-
Change the pad number.
-
Repeat.
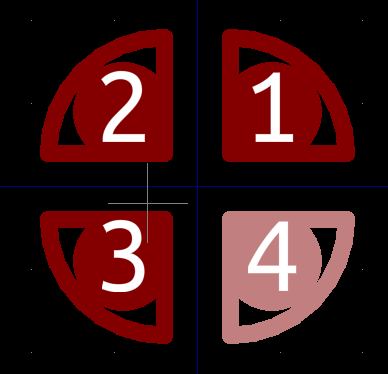
Now it looks like:

From this point forward should be straight forward. Add some silk screen, place texts etc.
Note that you can also go backward. If you discovered you made a mistake, then you can select one of the pad, right click on it and select: “Explode pad to graphic shapes” and this transforms your complex pad again in a simple pad and some other graphics items, so you can modifications and redo it.
This took me about half an hour, maybe more, but almost all of the time was for making screenshots, posting them, writing the text, and redo some stuff because I also made some silly mistakes.


